Botanical Photography with a Light Pad

Published by

on

The past two weeks in California have been scorching, with temperatures consistently over 100°F. Outdoor photography is challenging under the harsh sunlight and heat.

When life gives you lemons, slice them and put them under a lightpad. Home photography under controlled light and in the air conditioning is better than no photography, and I have a project: augment my GeoGalleries Summer collection, which features images in high key. And for that, I have been using a LED light pad.

What is a Light Pad?

A light pad is a flat, illuminated surface emitting consistent, even light. Designed originally for artists to trace images, it has found a unique place in photography. It is thin, portable, and comes in various sizes and brightness levels, providing a steady backlight for objects. Below is a photo of my Light pad, with the subject of today’s blog post, placed on top of it.

Benefits of Using a Light Pad in Photography

  1. Consistent Lighting

Light pads provide steady illumination, unlike unpredictable natural light. This consistency is crucial for product, flat lay, and macro photography.

2. Enhanced Details

Backlighting from a light pad highlights intricate details in delicate items like jewelry, flowers, or insects, revealing textures and making subjects stand out.

3. Versatility

Light pads add a creative touch to various types of photography, from food to still life. They are also useful for tracing and transferring images, handy for photographers who enjoy drawing or painting.

4. Portability

Their slim design and portability make light pads easy to carry and set up, whether in a studio or on location.

Photographing Translucent Subjects

Photographing translucent subjects like leaves can be challenging with traditional lighting. A light pad provides perfect backlighting, emphasizing the subject’s translucent qualities. This technique is particularly effective in botanical photography.

For example, the FEATURED PHOTOGRAPH (f/14, 1/125s, ISO 640), repeated below for convenience, showcases a great leaf (left side) and a ficus tree leaf. The technique is simple: place the leaf on the light pad, turn it on, and photograph it from above. I used a 50 mm prime lens mounted on a tripod for stability.

Tips for Using a Light Pad in Photography

  • Adjust Brightness: Experiment with different brightness levels to achieve the desired effect.
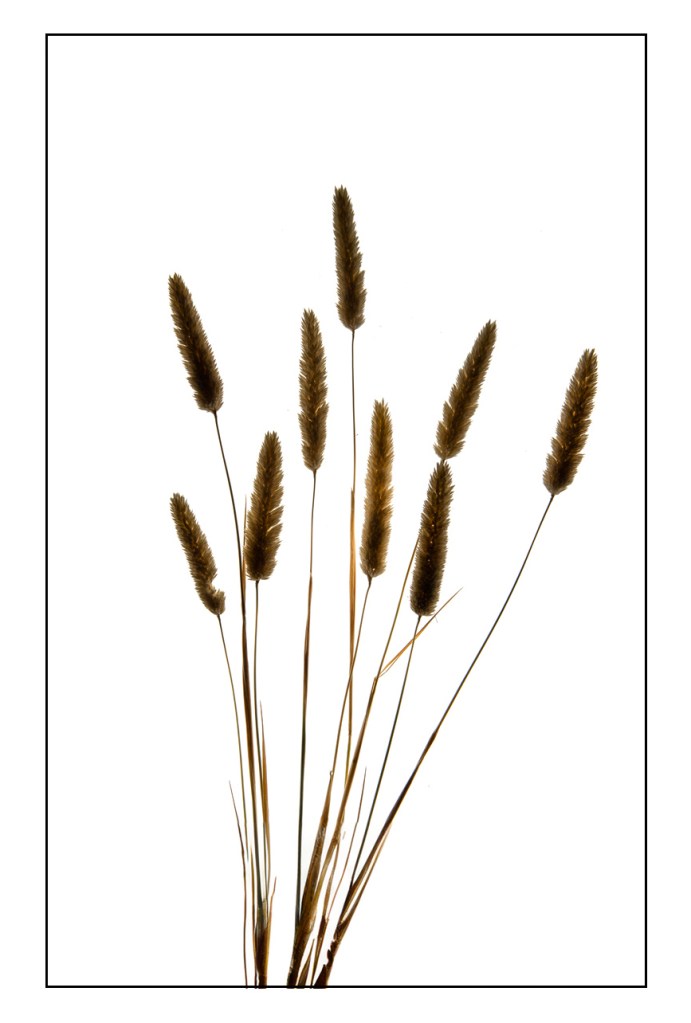
  • Combine with Other Light Sources: Adding other light sources can create depth and dimension. The photo below was obtained with a strobe facing the ceiling to add some light on the trip-dimensional heads of the grass stalks.
  • Use a tripod: if you are photographing indoors, it is possible that the light coming from the pad isn’t enough to keep a shutter speed that is consistent with sharpness, if you are using a longer lens. A tripos eliminates the need to worry about motion blur.

Conclusion

Incorporating a light pad into your photography is a cheap, easy and efficient way to produce botanical photographs on white background, highlighting the translucent parts of the subjects.

______________________________

Wall Art Botanical Images

Wall Art Photography projects

Wall Art landscapes and miscellaneous

________________________________

7 responses to “Botanical Photography with a Light Pad”

  1. stuartshafran Avatar

    Interesting project! I’ve heard of light-pads but never used one before so I had to look them up. Using it in this way seems like a really good idea.

    Liked by 1 person

    1. Alessandra Chaves Avatar

      Mine was a gift from a friend.

      Like

  2. tierneycreates: a fusion of textiles and smiles Avatar

    That is a brilliant way to beat the heat! I didn’t know a lightpad could be used like that for photography! I have a lightpad and I used it for tracing images to translate to textile art. Those images you shared that you created using the lightpad are amazing!

    Liked by 1 person

    1. Alessandra Chaves Avatar

      I used them to trace as well when I had to draw my insects for publications, a long time ago ( I’m an entomologist).

      Like

  3. Steve Schwartzman Avatar

    I like the way you used a light pad. I’ll have to try it.

    Last year I found a different use for a light pad, which I described to some local photographers as follows:


    From May of 1978 onward I put all my newly developed 35mm black and white negative strips in consecutively numbered clear archival plastic pages that held multiple strips per page. That way I could make contact prints of those pages so I’d be able to look at positive thumbnails of all the pictures and choose the ones I thought worth printing. I have six boxes filled with hundreds and hundreds of those old positive contact sheets.

    Previously, from 1969 through May of 1978, I’d been keeping all my black and white negative strips in glassine envelopes, with each glassine envelope holding a single negative strip. I bundled related strips with a paper wrapper on which I wrote the date, subject, place, or any other information I thought relevant.

    A few months ago I figured it was finally time to transfer those oldest negatives from their bundles of yellowing glassine envelopes into clear archival pages so I could easily see them again after 4–5 decades. I spent a couple of weeks laboriously transferring several thousand negative strips and at the same time creating a cursory Excel database to keep track of which things ended up in which new pages.

    Now I could hold those newly filled plastic pages up to the light and see the frames as negatives, but we all know that it can be hard to evaluate a picture as a negative. That difficulty led to the next phase of my project. I experimented with scanning a page of negatives on each of two flatbed scanners I have, but there were two problems: 1) the negative pages were a bit too large to fully fit on the scanners’ glass plates, which were intended for 8.5-inch-wide pieces of paper, so I’d have to do two passes per page 2) the scanner lamp created reflections from the shiny plastic of the pages. It became clear to me that I needed a larger device and one in which light came through the negatives from behind.

    To that end, last week I bought what’s called a light pad, a device that I found out people mainly use for tracing. Light pads come in different sizes, so I could get an A3 size that would be more than large enough to easily hold a 9×10-inch page of negatives. Light pads also come with different maximum brightnesses. Many online descriptions don’t tell you the pads’ maximum brightness, but some do, and I picked the one with the greatest claimed brightness I could find, 8860 lux.

    I used my iPhone 14 Pro Max to photograph each backlit page of negatives on the light pad. I set the phone’s camera app to raw mode, which for the 1x camera gives a whopping 48-megapixel .DNG image. I transferred those iPhone photos to my computer and opened each page image in Adobe Bridge, then double-clicked to bring up Adobe Camera Raw to make adjustments, which is how I process all my digital photographs (I’ve never used Lightroom). Even after cropping, I was left with a healthy 30-something megapixels per page. But I was still looking at negatives, and I wanted positives. Adobe Bridge and Adobe Camera Raw don’t seem to have a menu command to invert a negative picture into a positive. One workaround would be to open each page in Photoshop, which easily lets you invert an image (Command-I on my Macintosh). I could then have saved each inverted .DNG image as a TIFF or Photoshop file.

    With a little finagling, I discovered that there is a way to invert an image in Adobe Camera Raw. The Curve section in the right-hand panel of Adobe Camera Raw starts out with a graph showing a diagonal straight-line tone curve going from the bottom left corner of the graph to the top right corner. If you choose the Point Curve icon, which is the second one in the Adjust bar that runs across the top of the graph, you can drag the bottom-left point of the diagonal line straight up to the top left corner, and also drag the top-right point of the line straight down to the bottom-right corner. Voilà, the page of negatives on a white background has become a page of positives on a black background. After I inverted one page, I could batch-process that setting along to all the other pages in a few seconds.

    I found that digital contact sheets are better than the old chemical ones. With those old ones, the best we could do to see a frame better was use a magnifying glass. My 39-megapixel digital contact sheets are large enough that I can zoom in quite a bit on each frame to see more details on my computer monitor. I found I can pretty reliably zoom in on a frame by a linear factor of 4 or 5 to get an area 16 or 25 times as large as the default screen view. And of course on my monitor the images are brighter than they ever were on paper. The density of images on a single contact page can vary significantly, but Adobe Camera Raw lets me selectively brighten the ones that are too dark and tone down the ones that are too bright.

    All in all I found this to be a good solution to my original problem of having old negative bundled in a way where I couldn’t easily see them. If only all this had been available to us 50 years ago….

    Liked by 1 person

    1. Alessandra Chaves Avatar

      This is very useful, thank you. I have many negatives I need to transfer as well.

      Like

      1. Steve Schwartzman Avatar

        I didn’t know you need to transfer many negatives. You already have the light pad (if it’s larger enough for a page of negative strips), and now you have a method. Happy transfer.

        Liked by 1 person

Leave a reply to Alessandra Chaves Cancel reply

Discover more from It is all about the light

Subscribe now to keep reading and get access to the full archive.

Continue reading