
In chapter 1, chapter 2, Chapter 3 and Chapter 4 of this series of posts I wrote about the types of compositions that lend themselves naturally to a pleasing black and white photograph. I concluded that, in general, those images are simple from a compositional point of view, do not rely on color for the separation of their main elements, are rich in geometrical lines, angles, repetitive patterns and/or texture. I also wrote that drama can be an essential part of the appeal of a black and white photograph.
In this chapter, I will write a little about converting digital files to black and white. I have noticed that casual black and white photographers do not pay much attention to this phase, and end up disappointed with their results. Here’s a breakdown of three common methods for achieving this transformation:
Grayscale Conversion
The simplest method to convert a color photo to black and white is through a grayscale conversion. This method discards color information and keeps only the luminance values of the image. This often results in a straightforward black and white rendition. Software tools like Adobe Photoshop or Lightroom offer a straightforward “desaturate” function or a grayscale adjustment layer.
Grayscale conversion is efficient for quick transformations but might not provide the nuanced control over specific colors that other methods can offer.
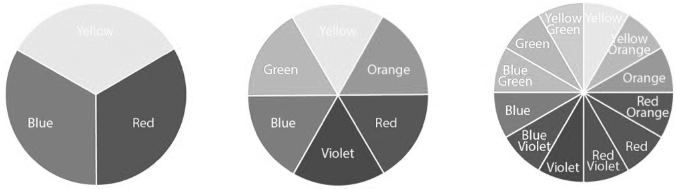
Let’s take look at how this type of conversion from color to grayscale (desaturation) affects the primary, secondary and tertiary colors. Note that by simply eliminating color will reduce the primary colors to similar grey tones.
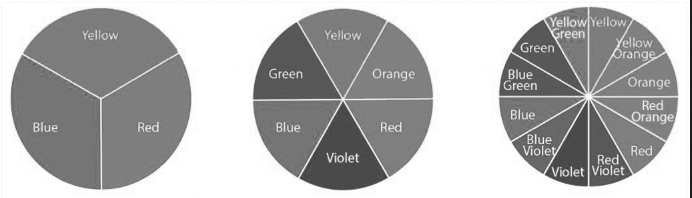
Desaturation of primary, secondary and tertiary colors
Some think that greyscale conversion is a good starting point and advise beginners to turn their cameras to monochrome in order to generate a live view devoid of color to see in black and white. I personally think that this is a waste of time that might discourage people from pursing monochromatic images, unless they decide to work with physical color lens filters, as used traditional black and white photography.
Channel Mixing
Channel mixing involves manipulating individual color channels (red, green, and blue) to emphasize certain tonal aspects of the image when converted to black and white. This method allows for a more customized approach to black and white conversion.
Each of the primary color channels will render a different gamut of tones from white to black.

Blue Channel
Green Channel

Red Channel
Presets
Another popular method is using black and white conversion presets. These simulate the effect of using color lens filters in traditional black and white photography. For example, a red filter can darken a blue sky, making clouds pop more distinctly in the converted image.
Various software tools and plugins offer a range of presets replicating the effects of classic filters like red, green, blue, and yellow. These presets can significantly impact the mood and contrast of the black and white image, allowing for creative and dramatic interpretations.
I use Photoshop in my post processing work. I edit my RAW images in color in Camera Raw, and save the file in Photoshop format (psd). I then create a black and white layer, and choose “Custom” from the drop-down presets menu. This allows me to manipulate the color sliders until I obtain the result that is consistent with my vision. This method gives me the greatest amount of control over my conversions, and I can always come back to the color file and edit my b&w conversion. Those who use Lightroom can manipulate the custom preset directly by moving the color sliders.

The photo above, in color, first appeared in this blog in “Americana in Arcata”, click on the link to see the original picture.
Choosing the Right Method
Selecting the ideal method for converting a color photo to black and white often depends on personal preference and the desired artistic effect. Grayscale conversion is straightforward and quick, while channel mixing offers more control and customization. On the other hand, using black and white conversion presets can provide a classic or stylized look to the image. More control can be achieved by manipulating the black and white sliders directly.
Experimenting with different methods and combinations thereof can help photographers understand the impact each has on their images, allowing them to make informed choices based on the desired outcome.
In conclusion, the process of converting a color photograph to black and white offers an array of creative opportunities. Whether opting for simplicity or seeking precise control over tonal values, these three common methods serve as a foundation for photographers to explore and craft compelling black and white imagery.
The FEATURED IMAGE (f/16, 0.6s, ISO 160, 105mm), repeated below, was taken last November at the Sonoma Garden. There were many skeleton leaves at that location on that day. Click to expand.
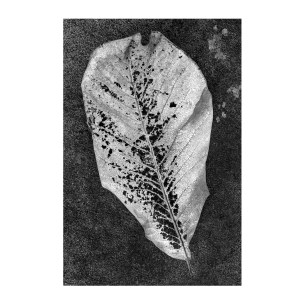
The black and white conversion was done using the method described above, by manipulating the black and white sliders in Photoshop. Below is the color version of it. Click to expand.

______________________________
Wall Art landscapes and miscellaneous
________________________________

Leave a reply to tierneycreates: a fusion of textiles and smiles Cancel reply