
INTRODUCTION
Tropical destinations are synonymous with stunning, colorful landscapes, vibrant cultures, and exotic wildlife. However, there’s an annoying element that often makes these locales unfit for landscape photography – the haze.
Annoying as it is to the unaccustomed photographer, the soft mist hovering over a lush rainforest can add a unique and captivating dimension to tropical photography. In this blog post, I’ll explore how to harness the mystique of haze to create interesting tropical images in black and white.
BACKSTORY
When I was in Brazil last September, I walked up and down the mountains surrounding the family house looking for compositions. As usual, fog and haze appeared here and there, and the haze was so thick some days that I asked myself if it was actually raining in the distance. Although I welcome fog more often than not, I cannot say the same thing about haze.
Click here to read my previous posts about my trips to Brazil.
ABOUT HAZE AND FOG
Haze and fog are both meteorological phenomena characterized by the presence of suspended water droplets or tiny particles in the air, but they differ primarily in visibility and location. Fog is a denser and more localized atmospheric condition that reduces visibility to less than 1 kilometer (0.62 miles) and often occurs near the ground, resulting in a thick, opaque mist that can significantly obscure objects and landscapes. In contrast, haze is a lighter and more widespread atmospheric condition where visibility is reduced, but objects and landscapes remain relatively visible. It occurs when fine particles, like dust, smoke, or pollutants, disperse in the air, creating a milky or hazy appearance without the same level of localized, thick obscurity as fog.
PHOTOGRAPHY TIPS
In the tropics, where humidity levels are high, haze and fog can form more easily, transforming the atmosphere into a dreamy, diffused canvas for photography. Here’s how to make the most of it:
- Shoot in rawformat: Make sure you capture the best resolution digital image with the greater amount of information possible. If your camera allows you to shoot raw, do so.
- Embrace the Mood: Haze and fog can alter the mood of your tropical shots. It softens harsh sunlight, creating a gentle, ethereal glow that’s perfect for romantic, dreamy, or mysterious atmospheres. Be attuned to the feelings that the haze evokes and use it to your advantage.
- Choose the Right Time: The best time to capture haze is during the early morning or late afternoon when the sun is lower in the sky. This lighting not only complements the haze but also adds warmth and depth to your images.
- Use a Telephoto Lens: A telephoto lens can help you isolate subjects within the haze, making them appear more prominent and enhancing the sense of depth in your photos.
- Experiment with Composition: Haze can transform familiar scenes into something otherworldly. Play with composition by using leading lines, framing techniques, and incorporating foreground elements to create depth and intrigue in your shots.
POST-PROCESSING TIPS
After you’ve captured your tropical haze images, don’t forget to enhance them during post-processing:
- Adjust Contrast: Use contrast adjustments to bring out the details in your hazy photos. Be mindful not to overdo it, as haze implies a certain level of softness.
- Adjust Dehaze: Use dehaze adjustments to enhance contrast and the outline of the landscape elements while being careful not to add too much noise or other artifacts.
- Enhance Colors: Haze can mute colors, so consider boosting saturation to make your tropical hues pop, or else, work in monochrome.
- Crop and Straighten: Crop your images to eliminate distractions and create a balanced composition. Also, check for any horizon lines that may need straightening.
THE FEATURED PHOTOGRAPH
I took the FEATURED PHOTOGRAPH (105 mm, f/14, 1/800s, ISO 400) at 7 am. After walking for about 1/2 hour, I came to the vista below (camera jpg). Note the very thick haze pretty much obscuring the landscape at a distance.

A few basic adjustments in camera raw included the following:
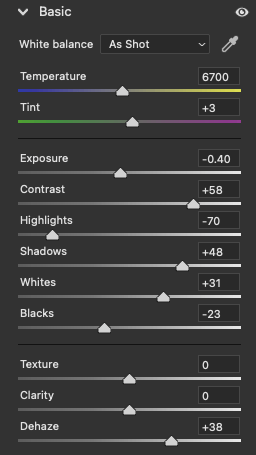
Note the unusual use of the dehaze and contrast adjustments. I also selected the sky and decreased the exposure and highlights in my selection (a similar effect can be obtained in camera by using filters). I processed the image in monochrome and exported it in photoshop format.
In Photoshop, I added a vignette and played with the “levels” adjustement to achieve the final, FEATURED IMAGE. Although I understand that it is not everybody’s taste ( I would not be surprised if it do not get a ribbon for it at a landscape contest) it fits my vision. I wanted to show the various layers of superimposed mountains, and the haze gives the scene a certain air of mystery. Although the image has soft feel, and is of relatively low contrast consistent with the presence of atmospheric humidity, there is an acceptable representation of black, white and different tones of grey.
CONCLUSION
Tropical photography is challenging due to the presence of haze and fog. Instead of fighting these annoying atmospherical elements, try to work with what’s in front of you. By understanding the nuances of haze and experimenting with different techniques, you can capture the enchanting, dreamlike essence of the tropics in your photographs. So, next time you find yourself in a tropical paradise, embrace the fog and haze and let it infuse your images with its mystique.
Click here for a photograph where I have embraced the fog, at the Yosemite National Park.
______________________________
Wall Art landscapes and miscellaneous
________________________________

Leave a reply to Alessandra Chaves Cancel reply