I don’t always sharpen my images. For example, I did not sharpen any image in my series Winter Tulips. It helps that most photos were shot at wider apertures, near the sweet spot of the lens I was using. Conversely, I applied the High Pass filter to all my images in Dry Leaf. Those were taken at narrow apertures (f/18-f/22) and that creates some level of fuzziness (resulting from diffraction). Additionally, I wanted to enhance contrast, and sharpening is one way to accomplish this.
Photoshop‘s high pass filter creates a sharpening effect based on the pixels surrounding the edges of the image. While Photoshop has other, dedicated sharpening tools (unsharp mask, smart sharpening) that work similarly, I tend to use the high pass filter method more often, because I love the control it gives me over my sharpening.
WHY USE THE HIGH PASS FILTER?
When working in series, I want I all images in a collection to have a homogenous appearance. For example, in “Dry leaf”, I endeavored to apply a similar sharpening effect to all photographs, and I wanted to be able to easily change amount of sharpening depending on where I send the images (printer, contests etc).
To accomplish the above, I used the high pass filter. This filter is applied to a separate layer that can be turned on and off or have its opacity modified according to my specific needs.
GOAL:
In this short tutorial, I will show how to implement the high pass filter, and suggest that this filter should be considered by Photoshop users working in projects and series.
PRE-REQUISITE to understand this tutorial:
To follow this tutorial, you need to be relatively comfortable working with Adobe Photoshop layers.
HOW TO APPLY THE HIGH PASS FILTER
- Open your image (a flat, one-layered image) and duplicate you layer;
- Name the new layer “High pass”;

- Click on the new layer you just renamed “high pass”. Go to the menu and choose filter – other – High Pass;

- Chose the amount of sharpening (ratius) you wish for your image. The radius controls the amount of pixels that are targeted around the edges. Something between 2 and 3 worked for me;
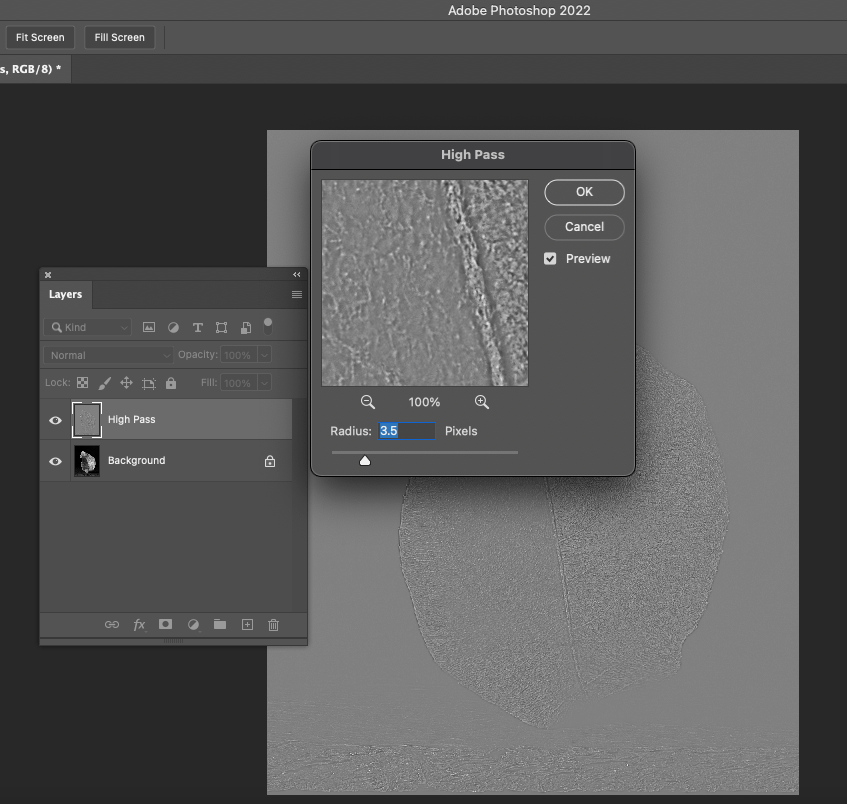
- Go to your Layers palette and set the Blending mode to Overlay;
- You can further control the amount of sharpening also by playing with the opacity of the High Pass layer. You can disable that layer if you need so send your image to the publisher or a stock agency if they require unsharpened images.

- Adding in a layer mask to the sharpening layer will allow you to take complete control over the sharpening effect locally.
Another filter that can be used in a similar way, but with a slightly different effect is Emboss. You can try to play with it and see if it suits the needs of your particular picture.
RESOURCES
If you are still interested in this technique, but found my tutorial too quick and difficult to follow, the Digital Photography School has a slightly longer and more thorough tutorial: Photoshop Tip: Using the High Pass Filter to Sharpen Images.
If you prefer a movie, I found a nice one here on YouTube. The photographer, Anthony Morganti, has a number of other Photoshop tutorials that can be useful to those of you who use this powerful software. (Disclaimer: I do not know the photographer and I am only promoting the channel because I use it and I like it).
QUESTION
What is your favorite post-processing software and which sharpening tool do you prefer to use?
______________________________
Wall Art landscapes and miscellaneous
________________________________

Leave a comment